Monday, October 31, 2011

Halloween Mysteries and Surprises

I just returned from a long weekend retreat with a group of creative and generous women from my guild. We arrived at the hotel laden with supplies ready for sewing, socializing, surprises and prizes.
RE tucked treats and assorted Halloween fabrics inside adorable boxes and challenged us to make blocks for a lucky winner.

Don't you think we succeeded brilliantly?
BG wrote up directions for a "mystery" project.  Sleuths followed clues and made beautiful table runners. Volunteers sewed gifts for the Red Stocking Soiree at New York Methodist Hospital and made tote bags for Reach to Recovery. And SV gave out pre-cut fabric kits packaged with instructions to make a block called Patience Corner. I don't know how this block got that name because it couldn't have been simpler to sew.  Another lucky winner got to go home with these.            
While all this was going on inside, a n'orester was raging outside. What we feared most was losing power and not being able to sew.  When the lights flickered once, twice, we held our collective breath, and crossed our fingers.


We later learned that was the moment the generator kicked in! 
We made decisions big and small.


What raffle prize to choose was the question of the hour.  And when L's name was finally called and she got to pick her prize, we sighed in relief. And the Halloween party began in earnest.


GREAT Scot!
WE HAD A BLAST!


Friday, October 28, 2011

FMQ - Bright Star

I made another quilt sandwich, but this time I used a walking foot to "baste" it and mark the grid lines at the same time.

I think practicing is making a difference because the lines of Bright Star were pretty darn straight right from the start.  

What was tough for me was crossing in the middle.  Even though I drew a spot in the center, I didn't hit the mark consistently.   But I think the large and small blocks look great together. I took a cue from Pat at colormequilty and decided to put my new FMQing skills to use and make some nice new potholders.  I picked up insulating batting called Insul-Bright today.  I wonder if it will feel different under the needle. I'll let you know!

Wednesday, October 26, 2011

After the Equinox - Taking Stock

I've put the garden to bed, organized my files in order to make the move from pc to mac, and packed up  projects for the upcoming quilting retreat.   It's autumn and time to take stock of my projects and maybe even set some goals for the season.  But first I wanted to show you the laptop case I made last week.


I used Elizabeth's pattern at Sew, Mama, Sew! for a Simple Laptop Sleeve and changed the orientation so that it opened like a letter envelope.  My laptop measures 9 x 13 x 3/4" so I cut the main panel pieces 10 3/4 x 14 1/2" and the flap panels  7 x 14".  If you decide to make one and the fabric you are using for the lining is directional like mine, don't sew it on upside down like I did here.
Don't you adore the lining fabric? It is  French General - Le Petite Ecole 

The main fabric is fab too - it is Kokka - Far Far Away - Three Flowers
The "clutch" fits folders 
or a book
    but is  for my mac.  Wouldn't it make a great gift for someone you love?


The Projects
I am up to date with the Free Motion Friday group at fluffysheepquilting.blogspot.com  as I got ahead of the others when I posted Week 3 - Slate Tiles too early.  One of the highlights of that blog post was getting a comment from Leah Day of The Free Motion Quilting Project.
She thought I was pretty funny when I replied that it felt like getting mail from a celebrity.
This week's lesson is Bright Star. It looks challenging. I'm sure all those straight lines are going to be hard to control.  Practicing FMQing might be the perfect thing to get my juices going when I arrive at retreat on Thursday, so a big quilt sandwich is going in my suitcase.


I'm also putting in my Joseph's Coat blocks. Alas, there are only 12 of these and they are not even completely finished.
I'm dying to see how they will look sewn together using Kellie at Don't Look Now! 's directions.  The  petals were appliquéd onto Kaffe Fassett's shot cotton.  It is woven with different color warp and weft threads so it has to be cut as if it is a directional fabric.  I love it because it has depth and luster.
they'll go together this way


This year's big quilting commitment was sewing along with Barbara Brackman's Civil War Quilt Block of the Week.  I was steadfast groupie, and didn't fall behind until August. I'm caught up now and all the CWQ BOWs are in my suitcase.  The center medallion is set and can't wait to put it on the design wall with the other 39 blocks. Something tells me they are going to get a lot of attention. 


It will be so much fun to see which are people's favorite blocks.  Which one is yours?


Even though I think I've taken this on every retreat, I think I am going to leave it home this time.   I've promised to show it at our Guild Show this spring and I am finally in the home stretch. I think I'll let it be until winter.   It'll be the perfect project for long chilly nights. 


Friday, October 14, 2011

FMQ stands for Free Motion Quilting on Friday!

Once upon a time I took a machine quilting class. 
We made quilt sandwiches and divided them  into grids so we could practice stitching.  Since then I've filled a couple of these but because I don't practice consistently I really haven't improved much. Which is not to say that I can't trace an image if I warm up for a few hours first.  
It is usually hit or miss and I often end up ripping out lots of of teensy weensy stitches
  
or ruining promising quilts ( I should take another photo of this one so you can really see the mess.)
When I found Free Motion Friday I decided it was time to do something about improving my technique.   I cut two 24 inch squares of muslin and drew 4 inch grids, sandwiched the batting inside and pinned. You could also sew a nice grid using your walking foot so it doesn't feel left out of the fun.


What I learned:
I am going to gobble up a lot of these sandwiches.
It is easier to work from left to right than right to left or bottom to top.
I have more control if I sit with both feet flat on the floor and my body is centered in front of the needle.
I got better with practice.
Week 1 - 1st attempt

Week 1 - 5th try
So because this was working, I thought I'd get do something daring.  I took the plunge and clipped open the toe on my darning foot ala  Leah Day 's instructions. This was not as scary as I am making it sound but I do recommend protective eyewear. Then I worked on Week 2,
Week 2 - 1st attempt

thinking, "what they heck, Leah seems to be on to something, remove the bar already."  Bending it back with the pliers didn't work for me.  It felt like the whole thing would snap off.   Instead, I borrowed a pair of small heavy snips from "his" toolbox and viola! off came the offending piece. After a few adjustments with the rubberband, I was good to go.
Week 2 - not too shabby
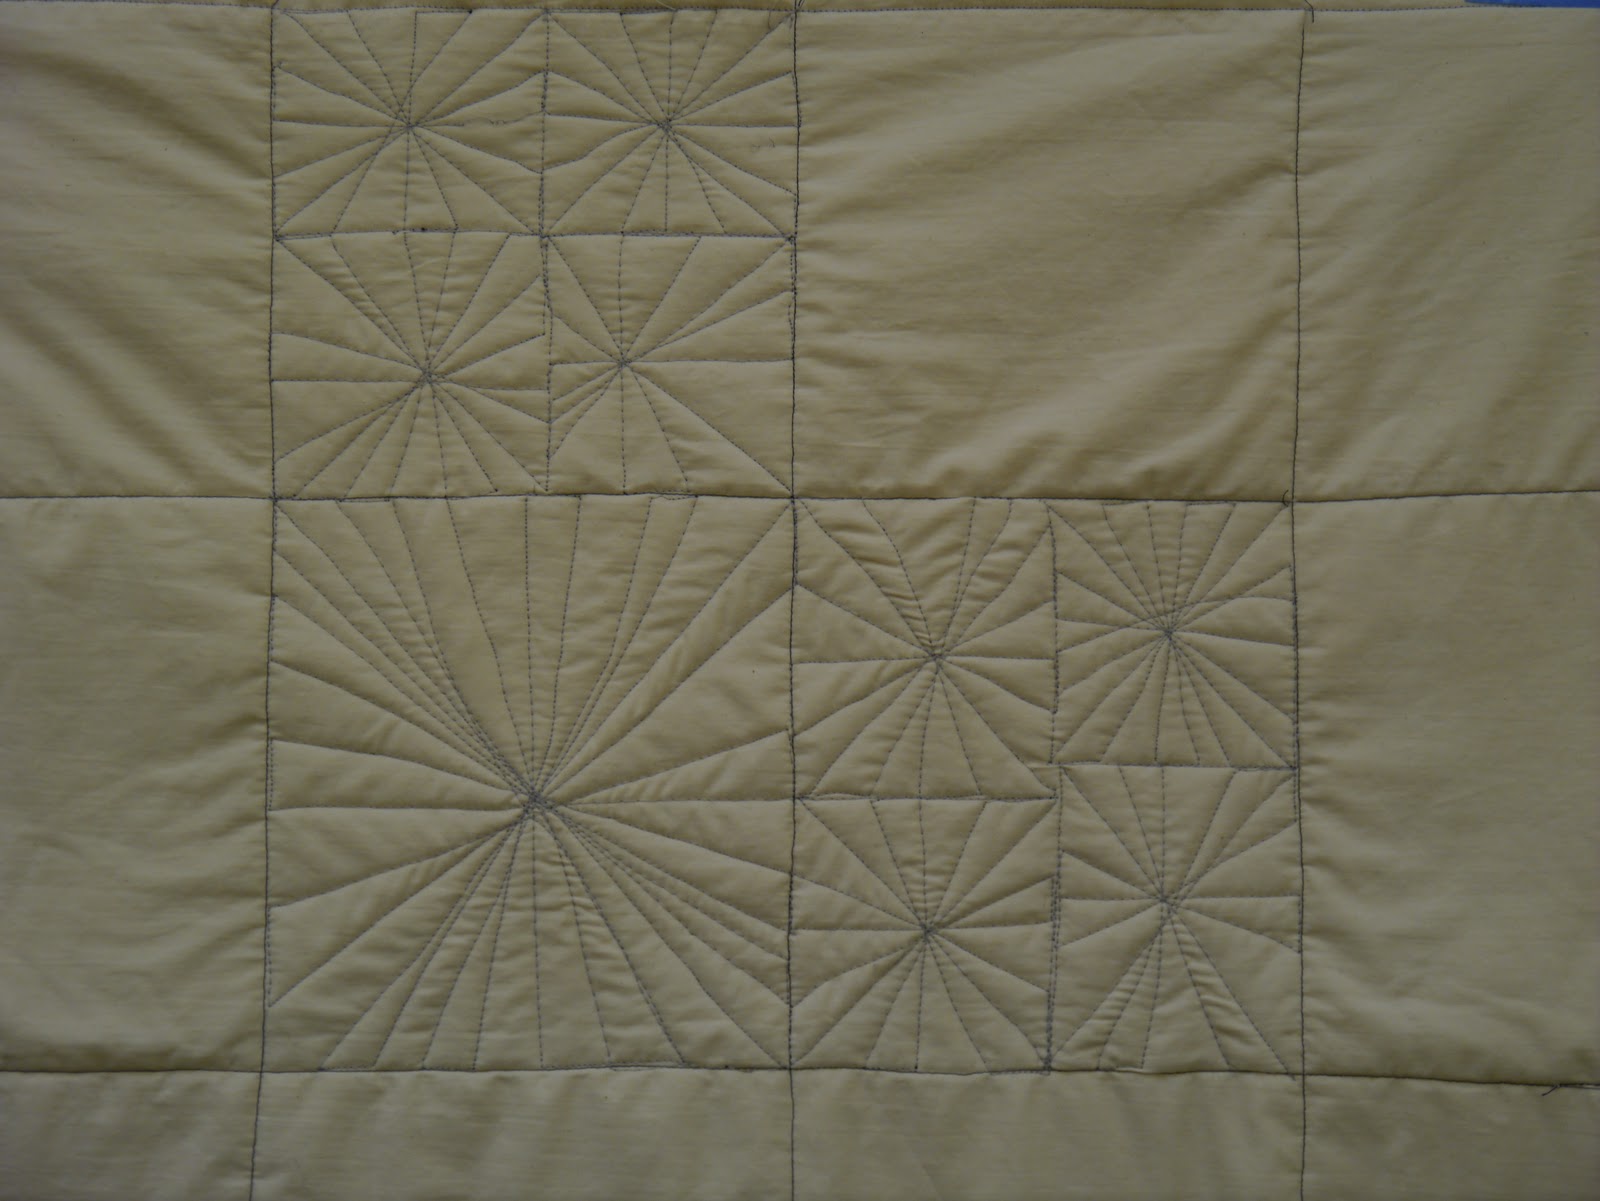
Week 3 ( I am catching up - it is really all this week). It is Free Motion Friday. Our exercise is  Slate Tile.
Week 3  Slate Tile 1-6

What I learned:
It is harder than it appears.
It is easier to stitch curves than rectilinear designs. In order to do turn the direction of the needle, it helps to  pause each time.
I have to know where I am going in order to get where I want to go.
Where you put your hands makes a difference.  Keeping my left hand above the upper left hand corner of the work, and my right hand below the right hand corner allowed me to minimize the pressure it took to move the fabric under the needle. It also gave me more control.


Sunday, October 9, 2011

72 Degrees - Done!

  The last bud on my passion flower vine bloomed last week.  But the corkscrew tendrils and leaves are still twining along the railing so I hung my finished quilt alongside and took this photo. 


72 Degrees - 
Machine pieced and Quilted; Hand-dyes and commercial fabrics

Piecing the last segments of the circle and seeing everything lie flat was so sweet. Until that moment I wasn't certain my design would work.  I used a walking foot to quilt both straight lines and curves. Because the finished quilt is 20" square  it was pure pleasure to manipulate under the arm of my machine.  I faced the quilt using Robin's "hidden binding" directions.  It is the perfect finish for art quilts.


detail


 I love waking up in the morning knowing that the only thing I HAVE to do is walk the dog. Tomorrow is one of those days. And I have big plans. 
First, I am going to make a 20 by 20 quilt sandwich and attach the dreaded FMQF to my machine.  Even though it is not Friday, I'll jump in with the other brave hearts and practice-a-long.  Better late than never.
Second, I am going to try and catch up with the civil war quilt block group. I have 5 to do.
Then I think I will take a deep breathe ( the bronchitis is finally breaking up) and revel in feeling good.
Wish me luck.